
はじめに
こんにちは。ネットワークエンジニアの「だいまる」です。
今回は、LPIC Level2 201試験の範囲の1つであり、ストレージ管理では欠かせないLVM(Logical Volume Manager)について、まとめていきたいと思います。
LVM(Logical Volume Manager)とは?
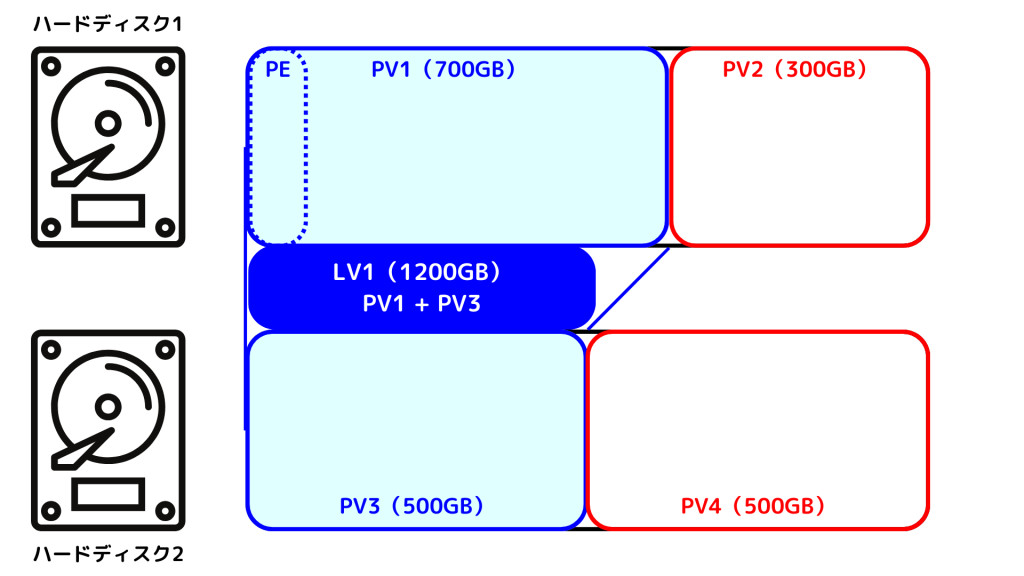
LVM(Logical Volume Manager)とは、「複数の物理ハードディスクやパーティションを仮想的な1つのディスクとして管理できる機能」になります。
この機能は、4つの要素から構成されているため、しっかり覚える必要があります。
LVMを構成する4つの要素とは?
LVMを構成する要素は「PE(Physical Extent)」、「PV(Physical Volume)」、「VG(Volume Group)」、「LV(Logical Volume)」の4つになります。
各種の概要と役割は表にまとめたいと思います。
| 項目 | 詳細 |
| PE(Physical Extent) | PVのブロックであり、デフォルトで4MB |
| PV(Physical Volume) | 物理的なストレージ |
| VG(Volume Group) | 複数のPVをまとめたストレージの集合 |
| LV(Logical Volume) | VGに紐づいた論理的なストレージ(パーティション) |
LV作成方法(実機確認含む)
各要素を頭に入れてもらった後はLV作成方法をまとめていきます。
fdiskによる対象確認
daimaru@raspi:~ $ sudo fdisk -l | grep sd
Disk /dev/sda: 931.51 GiB, 1000204886016 bytes, 1953525168 sectors
Disk /dev/sdb: 14.94 GiB, 16043212800 bytes, 31334400 sectorsfdiskコマンドでパーティションを作成します。
今回は「/dev/sda」と「/dev/sdb」を利用します。
daimaru@raspi:~ $ sudo fdisk /dev/sda

Welcome to fdisk (util-linux 2.38.1).
Changes will remain in memory only, until you decide to write them.
Be careful before using the write command.

This disk is currently in use - repartitioning is probably a bad idea.
It's recommended to umount all file systems, and swapoff all swap
partitions on this disk.


Command (m for help): n
Partition type
   p   primary (0 primary, 0 extended, 4 free)
   e   extended (container for logical partitions)
Select (default p):

Using default response p.
Partition number (1-4, default 1):
First sector (2048-1953525167, default 2048):
Last sector, +/-sectors or +/-size{K,M,G,T,P} (2048-1953525167, default 1953525167):

Created a new partition 1 of type 'Linux' and of size 931.5 GiB.

Command (m for help): w
The partition table has been altered.
Syncing disks.

daiamru@raspi:~ $ sudo fdisk /dev/sdb

Welcome to fdisk (util-linux 2.38.1).
Changes will remain in memory only, until you decide to write them.
Be careful before using the write command.


Command (m for help): n
Partition type
   p   primary (0 primary, 0 extended, 4 free)
   e   extended (container for logical partitions)
Select (default p):

Using default response p.
Partition number (1-4, default 1):
First sector (2048-31334399, default 2048):
Last sector, +/-sectors or +/-size{K,M,G,T,P} (2048-31334399, default 31334399):

Created a new partition 1 of type 'Linux' and of size 14.9 GiB.

Command (m for help): w
The partition table has been altered.
Calling ioctl() to re-read partition table.
Syncing disks.
PV(Physical Volume)の作成には「pvcreate」コマンドを利用します。
pvcreateコマンドは以下の書式で利用します。
#pvcreate <デバイス名>このコマンドを使ってPV(Physical Volume)を作成しましょう。
daimaru@raspi:~ $ sudo pvcreate /dev/sda1
  Physical volume "/dev/sda1" successfully created.
上記の通り、PV(Physical Volume)が作成されたので「pvdisplay」コマンドで状況を確認しましょう。
daimaru@raspi:~ $ sudo pvdisplay
  "/dev/sda1" is a new physical volume of "931.51 GiB"
  --- NEW Physical volume ---
  PV Name               /dev/sda1
  VG Name
  PV Size               931.51 GiB
  Allocatable           NO
  PE Size               0
  Total PE              0
  Free PE               0
  Allocated PE          0
  PV UUID               XXXXXXXX

  "/dev/sdb1" is a new physical volume of "14.94 GiB"
  --- NEW Physical volume ---
  PV Name               /dev/sdb1
  VG Name
  PV Size               14.94 GiB
  Allocatable           NO
  PE Size               0
  Total PE              0
  Free PE               0
  Allocated PE          0
PV UUID YYYYYYYYYPV作成後は「Volume Group」を作成します。
#vgcreate <VG名> <デバイス名>上記コマンドで作成できるので実際にやってみましょう。
daimaru@raspi:~ $ sudo vgcreate daimaru_test /dev/sda1
  Volume group "daimaru_test" successfully created
daimaru@raspi:~ $ sudo vgdisplay
  --- Volume group ---
  VG Name               daimaru_test
  System ID
  Format                lvm2
  Metadata Areas        1
  Metadata Sequence No  1
  VG Access             read/write
  VG Status             resizable
  MAX LV                0
  Cur LV                0
  Open LV               0
  Max PV                0
  Cur PV                1
  Act PV                1
  VG Size               <931.51 GiB
  PE Size               4.00 MiB
  Total PE              238466
  Alloc PE / Size       0 / 0
  Free  PE / Size       238466 / <931.51 GiB
VG UUID snff2h-Td1t-p6mT-6pH6-Kw13-nPuc-osNJ9fここに「vgextend」コマンドを使い、「/dev/sdb1」を追加してみましょう。
#vgextend <VG名> <デバイス名>コマンド書式は上記の通りになり、以下で実機確認してみましょう。
daimaru@raspi:~ $ sudo vgextend daimaru_test /dev/sdb1
  Volume group "daimaru_test" successfully extended
daimaru@raspi:~ $ sudo vgdisplay
  --- Volume group ---
  VG Name               daimaru_test
  System ID
  Format                lvm2
  Metadata Areas        2
  Metadata Sequence No  2
  VG Access             read/write
  VG Status             resizable
  MAX LV                0
  Cur LV                0
  Open LV               0
  Max PV                0
  Cur PV                2
  Act PV                2
  VG Size               <946.45 GiB
  PE Size               4.00 MiB
  Total PE              242290
  Alloc PE / Size       0 / 0
  Free  PE / Size       242290 / <946.45 GiB
  VG UUID               snff2h-Td1t-p6mT-6pH6-Kw13-nPuc-osNJ9f
以下の「lvcreate」コマンドを使い、LVを作成します。
#lvcreate <オプション> (VG名)| オプション | 詳細 |
| -L | ボリュームサイズ指定 |
| -n | 論理ボリューム名の指定 |
| -s | スナップショット |
実際にLVを作成してみましょう。
daimaru@raspi:~ $ sudo lvcreate -L 300G -n Daimaru_LV daimaru_test
  Logical volume "Daimaru_LV" created.
daimaru@raspi:~ $ sudo lvdisplay
  --- Logical volume ---
  LV Path                /dev/daimaru_test/Daimaru_LV
  LV Name                Daimaru_LV
  VG Name                daimaru_test
  LV UUID                QY3jyF-IDYi-5xG6-noi7-ZUBw-WF0L-a2KCM2
  LV Write Access        read/write
  LV Creation host, time raspi, 2025-03-05 17:16:19 +0900
  LV Status              available
  # open                 0
  LV Size                300.00 GiB
  Current LE             76800
  Segments               1
  Allocation             inherit
  Read ahead sectors     auto
  - currently set to     256
Block device 254:0LVの作成を終えた後は、ファイルシステムの作成を行いましょう。
daimaru@raspi:~ $ sudo mkfs -t ext4 /dev/daimaru_test/Daimaru_LV
mke2fs 1.47.0 (5-Feb-2023)
Creating filesystem with 78643200 4k blocks and 19660800 inodes
Filesystem UUID: 39bc40ba-0140-4f6b-b01b-baf6f8a0934a
Superblock backups stored on blocks:
	32768, 98304, 163840, 229376, 294912, 819200, 884736, 1605632, 2654208,
	4096000, 7962624, 11239424, 20480000, 23887872, 71663616

Allocating group tables: done
Writing inode tables: done
Creating journal (262144 blocks):
done
Writing superblocks and filesystem accounting information: donedaimaru@raspi:~ $ sudo mount /dev/daimaru_test/Daimaru_LV /mnt/hdd1
daimaru@raspi:~ $ sudo fdisk -l /dev/daimaru_test/Daimaru_LV
Disk /dev/daimaru_test/Daimaru_LV: 300 GiB, 322122547200 bytes, 629145600 sectors
Units: sectors of 1 * 512 = 512 bytes
Sector size (logical/physical): 512 bytes / 512 bytes
I/O size (minimum/optimal): 512 bytes / 512 bytes
daimaru@raspi:~ $ sudo df -h
Filesystem Size Used Avail Use% Mounted on
udev 325M 0 325M 0% /dev
tmpfs 93M 1.2M 91M 2% /run
/dev/mmcblk0p2 57G 4.5G 50G 9% /
tmpfs 461M 140K 461M 1% /dev/shm
tmpfs 5.0M 12K 5.0M 1% /run/lock
/dev/mmcblk0p1 510M 117M 394M 23% /boot/firmware
tmpfs 93M 48K 93M 1% /run/user/1000
/dev/mapper/daimaru_test-Daimaru_LV 295G 28K 280G 1% /mnt/hdd1
最後に
今回のLVMについてはいかがでしたか?
実機確認も行うと理解も速く、深くなりますよね。
これからもしっかり1つ1つやっていこうと思います。
記事が見つかりませんでした。